Indian Head Massage Treatment & Case Study
Published on 30 August, 2018 | Case Studies
Details of Indian Head Massage Treatment
how to do Indian head massage
I visited my clients house to provide the treatment. I took olive oil, a relaxation cd, pillows, towels, a small stool and a cushion.
Initial consultation: M filled out an initial consultation card which revealed that she was on no medication, had no underlying health issues, no skin problems and no allergies. She rated her stress level as 2.
I began by ensuring that M had eaten at least an hour previously. Next I asked M whether or not she had had an Indian Head Massage in the past. She hadn’t but had experienced full body and back and shoulder massages. I gave her some background into Indian Massage – explaining that it is a mixture of relaxing and invigorating, gained permission to use olive oil having explained how it helps reduce stiffness, nourishes the brain, is good for eyes, muscles and nerves and how it can help to purify the blood. She agreed to wear a towel so that I could massage her upper back, shoulders and neck easily.
Preparation: While M got ready I prepared the area by wrapping the pillows in a large soft towel, placing the cushion on the stool, putting on the relaxation cd, pulling the blinds to create a calmer atmosphere and warming a small amount of olive oil. Next I took off my shoes in order to feel more grounded and sat quietly taking a few slow deep breaths. I had two glasses of water prepared – one for each of us – and drank before starting the massage.
The Massage: 1. Having made sure M was comfortable on the stool with her arms resting on the pillows I made sure my hands were warm and began. I placed both hands on her shoulders while I took a deep breath. Next I placed one hand on her forehead and the other on the back of her head. I gently circled her head in one direction and then the other. From this point I made sure that I didn’t lose contact with M.
- I poured a small amount of the warmed oil onto one hand and began to use effleurage movements on the upper back taking care to work either side of the spine and as far up as the base of the neck. I repeated this 6 times to warm the back. Next I used my thumbs to work around and under the shoulder blades. Particularly on the right-hand side there were little knots so I continued by using my thumbs in small circles under the shoulder blades to ease these out. I finished this with a few more whole circles with my thumbs. As I worked I asked M whether the pressure was comfortable for her. She confirmed that it was. Next I used the heel of my hand to make circles again under the shoulder blades (first right and then left) and then release the energy from the body by ‘throwing’ it to the side. I repeated this several times for each side.
Next I worked on the upper traps – kneading out towards the shoulders with my thumbs and back towards the neck with my fingers. I repeated this several times. I then returned to the effleurage movement on the back to link to the next movement. Next I began hacking the muscles of the upper back – again taking care to restrict this to either side of the spine. I worked the right side and then the left. First I used alternate hands and then repeated using two hands together. I took care to keep my wrists flexible. Again I returned to the effleurage to link.
Next I used my knuckles to roll and slide either side of the spine – beginning at the base of the neck and working down. Once at the bottom I slid the knuckles back up again. Then I used the knuckles to invigorate, again either side of the spine, alternating and rubbing down and back up. Finally I used my thumbs, starting again at the base of the neck, either side of the spine, making small circles and pressing every inch down the back. I completed the back section of the massage once again returning to the effleurage.
- I next moved the effleurage to sweep and cup the side and back of the neck. I rubbed up and down each side of the neck in turn and then released the energy by ‘throwing’ it away to the side. Next I used my right hand to work on the back and sides of the neck, before changing this to a double handed movement working in gentle circles under the occiput – taking care not to work too near the ears. Next I gently released the energy from under the occiput using the heel of my hand to gently rub in small circles and ‘throw’ it to the side. I completed this section by using my thumbs to make small circles down the neck and smoothing back up before finishing with the sweeping and cupping effleurage.
- Next I asked M to let her arms hang by her side. I added a little more olive oil to both palms. I started at the shoulders and swept down to her fingertips – 3 times in the middle of the arms, 3 times on the fronts and finally 3 times on the backs. I made sure that I bent my knees so as not to put pressure on my back. Next I kneaded from the tops of the arms down to the wrists and then slid my hands back up. I repeated this several times before using ‘crab hands’ to invigorate the arms again working from top to bottom. I returned to sweeping down the arms- middle, front and back.
- I then used a rolled up towel behind M’s neck so that she could lean back on me and feel comfortable and supported.
Again I added a small amount of oil. I began by gently using hand-over-hand on her forehead. Next I moved to hand-over-hand cupping and smoothing under chin. These and the following movements I made slowly and steadily and repeated 3 or 4 times on each side alternately. I moved to thumbs in the chin groove, fore finger under the cheek bones, over the cheek bones and then stroking up the nose to the forehead. Next I had finger on finger up the nose, split at the top to gently circle the eyes and return again. Next I ‘hooked’ under the eyebrows and gently pressed and released. I then worked on the meridians pressing and releasing every inch up the centre of the forehead, midway along the eyebrows, at the outer edge of the eyebrows, over and under the cheekbones. After each set of ‘pressures’ I smoothed them back out. Next I put gentle pressure at the side of the mouth and then on the chin.
I continued with gentle ‘crab-hand’ flicks along the jaw-line. I smoothed up to the ears, massaging the ear lobes and up to the top. I gently pulled and ‘flicked’ the ears. I continued by sliding back down the the jaw and then used gentle taps all over the face. I completed this section of the massage by repeating the gentle strokes – cupping chin, in chin groove, under and over cheek bones, up the nose and then around the eyes. Finally I smoothed down to the temples and applied gentle pressure with small circles.
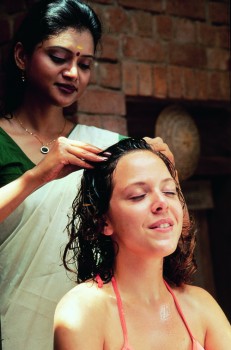
6.I added another small amount of oil before beginning by raking through M’s hair. I spread my fingers and moved through the hair from one side to the other several times.
Next I anchored my hands to her scalp and worked on moving the scalp. I worked front to back with both hands and then one hand at a time from back up to top. When working with one hand I used the other to support the forehead.
Next I invigorated the scalp, ruffling all over and then using tepotment to gently tap. I returned to the raking movement focusing on the nape of the neck.
I continued by placing one hand on either side of her head and using ‘train movements’ to manipulate the scalp. I kept my hands in the same position whilst lifting and releasing the scalp several times. I then gently took small amounts of hair and pulled and released – I repeated this over M’s whole head. I then worked on the meridians, beginning at the hairline and working down the back of the head – mid, central and end. I finished by raking through the hair again several times.
- I put one hand on M’s forehead and gently smoothed the other to cradle the occiput. I stayed like this while I took a few deep breaths. I used my thumbs either side of her spine at the base of her neck and made small circles and released. Finally I used smooth movements to sweep down the head, neck, back and away. This completed the massage.
- 8. Post – massage To make M aware that I had finished I rested both hands on her shoulders and informed her that the massage was completed. I asked her how she felt, quietly moved away and brought her water to her. I opened the blinds a little and turned the relaxation music down a little.
- I let her sit quietly for a few minutes and drink her water. She then went to dress. When she returned I went through the aftercare with her and asked her to fill in a feedback form. Her feedback was very positive. Her stress level had dropped from 2 to 1; she described the speed and pressure of the massage as ‘good’ and ‘consistent’; the atmosphere and organization was ‘ peaceful’ and ‘well-organized’ ; she was happy with the information given pre and post massage and said she would be happy to have further treatments and to recommend me to friends and family.
After care advice
When you have received an Indian Head Massage there are certain things that can aid healing and ensure that you get maximum benefit from the treatment.
FIRSTLY – take time to relax!!!
- Massage helps to flush out toxins from the body so always drink plenty of water or herbal infusions afterwards to aid this elimination.
- Try to avoid caffeine and alcohol and smoking.
- Try to avoid heavy or spicy foods. Processed and highly refined foods add to toxin levels in the body.
- Try to be aware of your posture. Bad posture can cause muscle tension.
Possible symptoms over the next 24-48 hours
- Tiredness
- Changes in sleep patterns
- Headache, dizziness, nausea
- Changes in bowel movements / urine
- Cold or flu-like symptoms
- Hot flushes
- Excessive perspiration
- Aching or sore muscles
M told me that she felt relaxed and calm but energized as well.
She was keen to have a further massage which we planned for a fortnight later.
Other clients
I completed 3 other case studies on 3 other clients.
Each completed an initial treatment card before the first treatment. I have attached examples of the initial treatment card and the client feedback form.
None of the clients were particularly stressed but one made me aware of a lot of knots in her shoulders. For this client I concentrated more on the shoulder and back movements to try and free these up.
All the clients were happy with the speed and pressure of the massage and were happy to have further treatments. This has allowed me to get plenty of practice over the last 3 months.
One client commented that they would have liked to have more ‘smells’ involved. I am now using Neal’s Yard blended oils in a burner as I work.
The treatments I have given have been a mixture of at my house and at the house of the client. I have enjoyed this variety and all the clients have been happy with the relaxed atmosphere created. During the treatments at my own house I have been able to use candles to add to the relaxed mood.
Learn Indian Head Massage with Luna Holistics Home Study Training Courses