Teaching Yoga – Case Study
Published on 27 May, 2016 | Case Studies
Teaching Yoga
Yoga Case study Example
Preparation
Before my students arrived to the Yoga class, I get ready yoga mats, and next to each yoga mat I’ve put paper sheet, on them beforehand I’ve print Mantras with English transcription and translation. We start our class with initial prayer, this helps students to tune the mind to the Divine in its different aspects and to concentrate more for the coming Yoga practice. Also I’ve turn on relaxing lovely music.
Arrival of Students
I had eight students arrived to the Yoga class. None of my students has any history of the strong pains or diseases. I ask my students how they feel today. After I ask them what they think the Yoga Freedom is. We spoke about how it is important to listen to the own body and senses, also we spoke about freedom in our lives. It was interesting to observe students, they were very open and sincere at the moment they were explaining their vision and own understanding of freedom. All students came to conclusion, that there are no restrictions in Yoga Freedom.
Step 1
The practice began with a five minutes of relaxation. These five minutes can make a difference between having a good session, and a session where you are not satisfied with your practice. During this time, the body has a chance to prepare itself for the practice and the mind can concentrate on the task ahead. The breathing also calms down and becomes more rhythmic, regulating and concentrating the life force. Slowly my students bring their awareness and attention to the practice, away from their daily cares and concerns.
Correct breathing
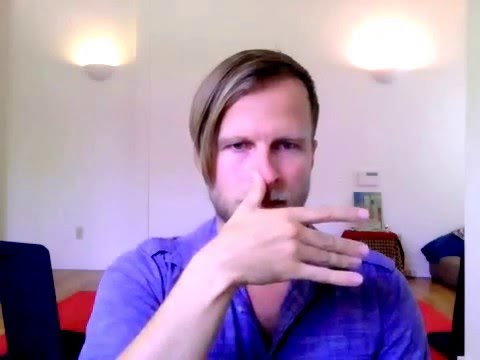
We start our class with an invocation, an initial prayer to the higher energies. This is another way of focusing the attention of the practice through the power of Mantras. After tuning the mind to the Divine, we continue our class with breathwork – pranayama, this is very important as the breath is the part of our life force. We start it with a similar technique to Alternative Nostril Breathing, just without any sharp, short, forced exhalation from the nostrils. Students were breathing in with awareness of the breath coming in more through the right or left nostrils. On each inhale I ask students to change the side of the nostril. Same with the exhale, they were changing leaving breath more through the each nostril. I ask my students to observe how they bodies moves with the breath and to tell me how they feel. After this technique I offered my students to breathe rhythmically with their own guidance. I ask them to find out their own natural breathing rhythm, where it feel right, then they used to count how long it take to breathe in. They were observing their breath and looking how they can change control over it. Also I’ve introduced them Humming Bee Breath technique, which helps to focus inwards.
Students should cover their eyes with the fingers and use the thumb to gently press on the ears, keeping the mouth closed they should exhale. This is a wonderful practice to interrupt the negative spiral of thoughts that sometimes accompanies depression and anxiety. It also interrupts the intrusive thoughts. After finishing our breathwork we start to do physical part of the Yoga practice. I ask my students to show me they suggestions for our warm up. Each student was showing exercises and all class used to follow the movement of this student. After our warm up we began our main practice. Students were asked to listen intently the way the body responds to each movement and to do changings if they feel uncomfortable.
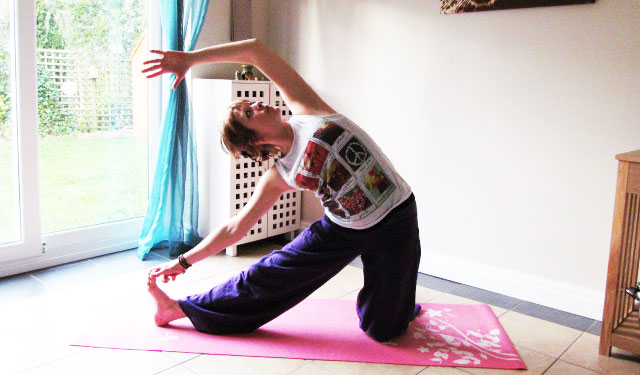
Mountain Pose
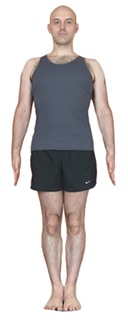
We start with stand in the Mountain Pose at the front of the mat with feet hips-width apart. On an inhalation we extend the arms out to the side and over the head. Bending the arms, we take hold of the outer edge of the elbows. Using the fingers of the right hand, we draw the left elbow over to the right and bend to the right on an exhalation. We turn the head to gaze down at the right little toe. To prevent collapsing into the right side of the spine, I ask my students to push down strongly through right leg. We repeat same on the second side. Returning to the Mountain Pose, we extend both arms over the head. Keeping the left arm overhead, we bent to the right, bringing the right arm down along the side of the right thigh. As we bent to the right side, we turn the head and neck on the diagonal to gaze down at the right little toe. After three breaths we repeat on the second side. We bend forward from the hips, release the trunk over the legs, bringing fingertips to rest in front of the body. We come to Forward Stretch Pose. I ask students to notice how far forward they are able to bring the trunk. Then we turn both feet outwards, so we were standing in what is known in ballet as first position. Keeping hands centered, we slowly shifted weight more onto the right foot, allowing hips to veer off-center. I ask students to observe how this opens and releases the deep muscles of the hip. Then we veer off-center to the left. When we return to center, we turn the feet to face forward once again and folded forward over the legs. Students were surprised to find out how much further they are able to bend after releasing the deep muscles of the hip. Then we lung the right leg back behind, allowing the knee to rest lightly on the floor. Slowly we turn the body to the left, rotating left foot. We lift the right knee off the floor and slowly turn onto the outside of the right hip. Pointing the toes of right foot and completely straighten the right leg.
Lunge Pose
We come to Lunge Pose this way. With right hand centered under the shoulder, we press down strongly through the right arm to increase the length along the right side of the trunk. Then bringing the left hand to rest along the inside of the right leg. Then we worked to bring the chest into a vertical position while keeping the right hip low to the floor until the feel a satisfying stretch along the whole right side of the body. In the end we rotate the trunk to the right to return to the original Lunge position. We repeat same on the other side. From the Lunge position, we step the left leg back into the Downward Dog Pose.
Downwood Dog Pose
We press strongly through the arms and reach back through the sitting bones and tail to lengthen the trunk. Then we bend the left knee and slowly lower the right heel to the floor. As we stretch the right heel to the floor, we lift the front of the shin and maintain the arch through the foot so we do not achieve the movement by collapsing into the ankle joint. As we lower the right heel, we actively reach back through the right thigh. We repeat same on the other side. Then we return to the first side, and stretch the right heel down once again. This time we actively reach the tailbone to the left, allowing the left knee to turn toward the right underneath. We press strongly through both arms to elongate the spine as we bend to the left. Same we do with other side. Then returning to the original Downward Dog position, we step left foot slightly forward and under the midline of the body. We extend the right leg into the air behind and slowly bend the right knee. We ground the arms strongly into the floor as we simultaneously reach up through the length of the right leg. Then slowly we turn belly to the right and upward toward the ceiling. On each inhalation I ask my students to focus on elongating from the head to the tailbone, and from the hands to the feet. This prevents from collapsing into lower back. I ask my students to show me how they would like to variate this pose, what they bodies and minds wishes to explore. From Downward Dog, we move forward through the arms into Upward-facing Dog with the arms straight.
Upward -facing Dog Pose
We bend both knees and flex them so the soles of the feet face the ceiling. Slowly we lower the left groin closer to the floor, and we turn to gaze at the right side. We repeat this a number of times to each side. We continue class with the Child’s Pose. As Child’s Pose is a resting position, it’s important to make modifications that students can feel comfortable, safe, and supported in the pose. I ask my students again to show me they own variation if they do not feel fully comfortable in this pose. Next was Shoulderstand. I always want my students to come into this pose smoothly, avoiding jerks. They can stay in this pose as long as comfortable, and come out whenever they feel tired or unable to breathe properly. We’ve also tried this pose in different variations that I offered for my students. One of them was feet pressing onto a wall, which takes some weight off the shoulders and gives the upper arms and shoulders a moment to rotate outward and the chest to open.
Smoothly we’ve moved to Sitting Forward Bend. I offered students to hold a strap around their feet to feel more confident. To alleviate any discomfort due to compression of the buttocks, I ask them to place a yoga mat under the body. As I had in class eight students, all of them are very different individuals and respectively each had a different reaction when I was asking to do they own variation or even when I was asking them to show me how they would feel more comfortable in the poses, some of them felt very open and they were showing me what is best for them, some of them were following me or trying to follow they classmate, but the most important that they deeply understood how it is important to move following they heart. My students were smiling a lot. It is very important, to feel happy when you do something. I was supporting them with comments that everyone has own rhythms and everyone should try to be open to this rhythms as more as it possible, as they are the part of us.
Lotus Pose
After posture sequence I ask my students to move to the Lotus Pose. I ask them to lift the arms in front of the body, to exhale and circle both wrists as the arms lower to either side of the body. I’ve introduced them Flamenco Hands flow. This circling of the wrists is very good for shoulders opening. We finish our class with final relaxation – Corpse Pose (Savasasna). Students had a rest about ten minutes. Savasana integrates the benefits of the whole practice. I ask them to close the eyes and give them command to each part of the body to relax. In the end of Savasana I ask my students to stretch if they would like to. In the end of our class we had a discussion about how successful is their home yoga practice, what postures they loves to do, are they changing something in postures following their individuality. My students really enjoyed this untraditional yoga class and as they said they had fun. I had a comment after class that I need to do such classes more often as this helps to understand the sensations of the body to the emotional state. And of course, I will do my best to help each student to open more from within
Case Study Example – If you would like to learn how to teach yoga then enjoy a rewarding career as a either a part-time or full time training provider with our Online Yoga Teaching Diploma Course – recommended for those whom already have a good understanding of Yoga.